
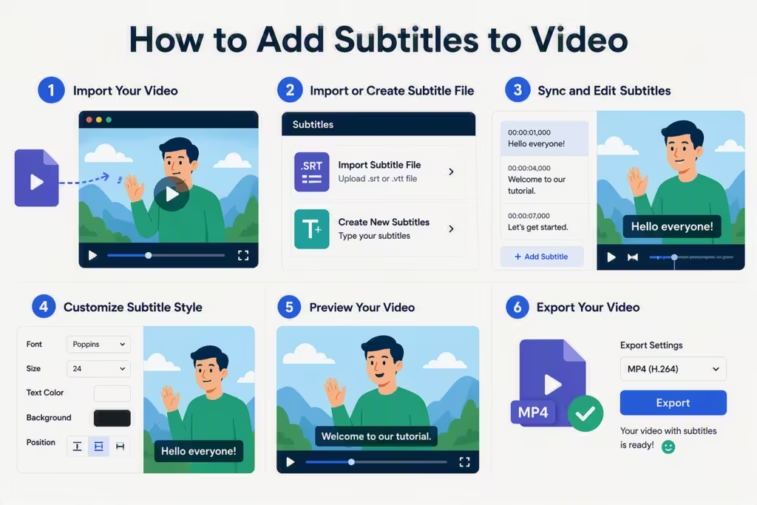
How to Add Subtitles to video takes minutes in 2026, not hours — but only if you pick the right method for what you’re actually making. This guide walks through every real way to add subtitles: AI auto-generation, manual SRT writing, burned-in captions for social media, and platform-specific steps for YouTube, Premiere, CapCut, and free tools like VLC-compatible SRT files — plus why subtitles matter more than most people realize.
Why Subtitles Matter More Than You’d Think
Before the how-to, a quick reality check on why this is worth doing properly: 85% of Facebook videos are watched with the sound off, subtitles can lift overall engagement by as much as 40%, and search engines can’t watch a video but can read a transcript — sites with video transcripts have seen organic traffic increase by 40 to 60% within six months. Accessibility laws also increasingly require captions on public-facing video content. How to Add Subtitles to Video; In short, subtitles aren’t a finishing touch anymore; they’re closer to a baseline requirement for anything you want people to actually watch, understand, and find.
How to Add Subtitles to Video? Understand the Three Methods Before You Start
There are three fundamentally different ways to add subtitles to a video, and picking the right one depends entirely on what you’re making and where it’s going:
- AI auto-generation — Upload your video to a transcription tool, get back a subtitle file with timestamps, then attach it in your editor or platform of choice. This is the fastest method for almost everyone, typically taking 2 to 5 minutes for a 10-minute video.
- Manual subtitle writing — Typing out subtitles yourself in a text editor or dedicated subtitle tool, with full control over exact wording and timing. Best when you already have a script or need precise control AI can’t reliably guess.
- Burned-in (hard-coded) captions — Subtitles permanently baked into the video image itself, always visible and impossible to turn off. This is the standard for TikTok, Instagram, and most short-form platforms, where soft (toggleable) captions don’t reliably display.
A separate, related choice sits underneath all three: whether you want a soft subtitle (a separate track viewers can toggle on or off, standard for YouTube and most video players) or a hard-coded one baked directly into the picture. How to Add Subtitles to Video; Soft subtitles are more flexible and accessible; hard-coded ones guarantee visibility regardless of platform quirks.
Method 1: Add Subtitles Automatically With AI (Fastest, Best for Most People)
How to Add Subtitles to Video; This is the method most creators should default to in 2026, and the workflow has gotten dramatically simpler over the past couple of years.
Step 1: Upload Your Video
Drop your file into an AI captioning tool. Most modern tools — including options built into Canva, CapCut, Descript, and dedicated transcription platforms — run auto-transcription automatically the moment the upload finishes, using speech recognition models (commonly Whisper or Google Speech-to-Text under the hood) to generate word-level timestamps.
Step 2: Generate the Caption Track
With transcription complete, generating the actual caption track is typically a single click. Modern AI tools hit 95 to 99% accuracy on clear audio, compared to the 6 to 9 hours manual subtitling would take for the same footage.
Step 3: Choose a Style Preset
Most caption tools now ship with platform-specific presets — a bold, high-contrast style tuned for TikTok, a cleaner minimal look for YouTube, and so on. Picking the preset matched to where the video will actually be published matters more than most people assume; a caption style built for a mobile short-form feed often reads poorly on a longer YouTube tutorial, and vice versa.
Step 4: Export as SRT or Burn It In
Decide whether you want a separate subtitle file (SRT) you can attach anywhere, or captions burned directly into the video. If you’re publishing to multiple platforms, exporting an SRT file first gives you the flexibility to reuse it — burning captions in locks you into one style and one video file.
Method 2: Write Subtitles Manually (Best When You Have a Script)
How to Add Subtitles to Video; If you already have an exact script, or need precise control over wording that AI transcription might get wrong (technical terms, names, brand language), writing subtitles manually is often faster and more accurate than fixing AI errors after the fact.
What an SRT File Actually Is
A subtitle file is simply a plain text file that tells a video player what words to display and exactly when. The standard format is .srt (SubRip Text), structured like this:
1
00:00:03,000 --> 00:00:06,000
Hello!
Each numbered block contains a start time, an end time, and the text to display during that window.
Free Tools for Manual Subtitle Writing
- Aegisub — a free subtitle editor for Windows, macOS, and Linux, particularly strong for precise timing control.
- Subtitle Edit — another well-regarded free editor, Windows-primary but runnable on macOS and Linux through Wine or Mono.
- VLC Media Player — free and cross-platform, useful for previewing and testing your subtitle timing before finalizing.
Once your SRT file is written, you have a few options depending on your final destination: keep it as a separate file (simplest), embed it as a soft subtitle track using a tool like MKVToolNix (best for local playback without re-encoding), burn it directly into the video with a free encoder like HandBrake (best for social media), or upload it directly to a platform like YouTube.
Method 3: Burn In Captions for Social Media
How to Add Subtitles to Video; For TikTok, Instagram Reels, and similar short-form platforms, hard-coded captions are the standard, not the exception — largely because a meaningful share of that traffic comes through muted autoplay, embeds, and screenshare contexts where soft captions either aren’t supported or simply won’t be seen.
Most modern AI captioning tools handle this natively: after generating your caption track, you select “burn in” or “export as video” rather than exporting an SRT, and the captions become a permanent part of the video frames. Free tools like HandBrake can also burn in an existing SRT file onto any video if you already have a subtitle file from another source.
Platform-Specific: How to Add Subtitles in Common Tools
YouTube
Upload your video, then go to your YouTube Studio dashboard, select the video, and open the “Subtitles” tab. You can upload an existing SRT file directly, or use YouTube’s automatic captioning (worth reviewing and correcting, since auto-caption accuracy varies with audio quality). How to Add Subtitles to Video; This route is often the simplest for casual sharing: no software installation required, subtitles remain toggleable, and they work across every device.
Adobe Premiere Pro
Premiere includes a built-in Text-Based Editing panel that generates a transcript automatically, which you can then convert into a captions track, edit for accuracy, and style directly on the timeline before exporting.
CapCut
CapCut’s auto-captions feature generates a caption track from your video’s audio in a few taps, with a range of built-in animated styles well-suited to short-form, social-first content.
Canva
Canva’s video subtitle generator creates subtitles directly from your video’s speech, letting you adjust size, alignment, and color, and even match your brand font on paid plans, before exporting the finished video.
Which Method Should You Actually Use?
A quick decision guide based on what you’re making:
- Long-form YouTube video or tutorial? Use AI auto-generation, review it for accuracy, and export as a soft subtitle track (SRT) uploaded to YouTube directly.
- Short-form TikTok, Reels, or Shorts content? Use an AI tool with a burned-in caption preset — soft subtitles won’t reliably display on these platforms.
- Corporate, legal, medical, or broadcast content? Use AI auto-generation as a starting draft, then have a human verify and correct it — accuracy requirements here are too high to trust AI output unreviewed.
- You already have an exact script? Write the SRT manually rather than fighting AI transcription errors; it’s often faster for scripted content.
- Publishing the same video to multiple platforms? Generate one accurate SRT file first, then either upload it as-is (YouTube, most players) or burn it in per-platform as needed, rather than starting from scratch each time.
Common Problems and Quick Fixes
- Subtitles out of sync: Nine times out of ten, this comes down to a frame-rate mismatch or an encoding issue with the source file, not an error in the subtitle timing itself. Re-check the video’s frame rate against the subtitle file’s timestamps.
- Subtitles not appearing at all: Usually a file-naming issue — many players expect the SRT file to share the exact same filename as the video file, sitting in the same folder.
- Low AI transcription accuracy: Background noise, overlapping speakers, and heavy accents all reduce automatic transcription accuracy. Cleaner audio consistently produces meaningfully better results, so if accuracy matters, it’s worth improving the audio source rather than just accepting AI errors.
The Bottom Line
How to Add Subtitles to Video; Adding subtitles to a video no longer requires the tedious, hours-long manual process it once did. For most people, the fastest and most reliable path is AI auto-generation — upload, generate, review for accuracy, and export in whichever format matches your platform. Manual SRT writing still earns its place when you need precise control over scripted content, and burned-in captions remain essential for social platforms where sound defaults to off. Whichever method you choose, the real mistake in 2026 isn’t picking the “wrong” tool — it’s skipping subtitles altogether on content that most viewers will otherwise watch on mute.